Now we’re ready to do final assembly operations for the project.
Before you begin, I recommend that you do some serious housekeeping around your bench or your assembly area, if you have a separate spot. If you are like a lot of woodworkers, you might have a tool or two on your bench, along with some sawdust or shavings from your hand plane or scraper. Right now is the time to get all of the debris left over from your milling and smoothing operations cleaned up. Put away all of the tools, vacuum the bench top and the floor. You’re at the point in the project where significant care should be taken to maintain the surfaces you’ve worked hard to create. This additional care during assembly will pay off when you begin applying a finish.
Get your hands on some carpet remnants or a quilted moving blanket to cover your bench or assembly table. Even with a clean bench top, project components can (and do) slip out of your hands and a collision with a hard bench top can ding an edge or round a corner. A bit of padding on your work surface will help prevent damage.
Careful Clamping is Key
Clamping components together is a staple of the glue-up and assembly processes. But clamps can damage components if they’re not carefully applied, and if a big bar clamp slips or slides into your work, you have repair work ahead.
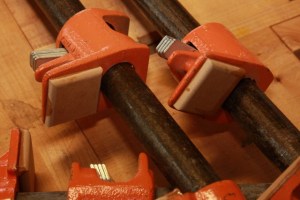
I use four kinds of clamps in my shop. I have a lot of pipe clamps with Jorgensen heads. The nice thing about pipe clamps is the ability to change clamp length by moving the heads to different length pipe. Over the years I have epoxied small squares of 1/4″ MDF with rounded edges to the faces of both clamp components, rounded edges facing the component to be glued up. I have found that it is considerably easier to attach these clamping blocks or pads to the clamp than it is to struggle with loose clamping blocks, the clamps, the glue bottle, and the components. The alternative, which I did for a few years, is to tape clamping blocks to the components before gluing up. Eventually I wised up. Here’s an image:
The second kind of clamp I use is a Bessey K-body in varying bar lengths. I like the performance of these clamps, but they are expensive, and limited by the length of the bar. I have not found the pads to mar or discolor surfaces, but if I am applying them to relatively soft woods, I will use a clamping block where needed.
The third clamp style is a Jorgensen F clamp, either the heavy-duty or “3700” style clamps. I don’t use the light duty clamps for glue-ups because there is too much flex in the bar. The heavy-duty style does an acceptable job in the right circumstances, with one caution: the factory-applied orange clamping pads will stain the work if they are left in place too long. Some time ago, I removed these clamping pads and replaced them with MDF pads similar to those pictured above. In my shop, the “3700” clamps are mostly utility clamps, and see limited duty during glue-ups.
The fourth and final style clamp is a wooden handscrew. These “old-fashioned” clamps can exert a tremendous amount of clamping pressure, and are really quite useful in the right application. They are limited by the size of the jaw opening, and so are not suitable for large-scale glue-ups.
There is at least one trait common to all of these clamps: they must be kept clean. Furniture assembly is messy business. Glue gets squeezed out of joints and panels, and some of it is going to find its way to your clamps. Clean it off as soon as the glue-up is complete. The drop you miss today will be the one that gets pressed into the surface of your next glue-up. How do I know this? If you’re clamping panels using pipe or bar clamps, it is sometimes helpful to put a short piece of masking tape on the bar or pipe directly below the joint being glued. That way, squeeze-out can be easily removed when the glue-up is complete.
A Last Look and Some Housekeeping
Once the project is completely glued together, do a careful inspection of every surface. You’re looking for any errant glue squeeze-out, as well as any damage or marking caused by the clamps. The best way to look for these assembly remnants is with strong light from a window or from a set of halogen lamps on a stand. You want the light raking off the surface at a low angle and bouncing into your eyes. Take your time and look at every surface and joint. If you find glue use a scraper, a sharp chisel, or a dental pick to remove it. If you notice marks from the clamps, a light sanding or a touch-up with your scraper or hand plane should clean things up. Use care when manipulating the project to preserve all of the surface preparation work you have done. Keep the project on the moving blanket or carpet remnant as much as possible.
I like to clean the finishing area of the shop the night before I plan to apply finish. I will vacuum floors and work surfaces, and also vacuum the project. I also turn off the ceiling fans so that any bit of airborne dust have the chance to settle out of the air. I save the tack cloth for just before the first coat of finish goes on.
Now is the time to get out the project cutoffs mentioned earlier in this series. They should have been planed, scraped or sanded (or all of the above) just like the project components were. They should be vacuumed to clean up what dust has accumulated since you produced them.
In the next post we’ll start applying finish to the sample boards and evaluating the results.
Previous Posts in this Series:
Finishing for Non-Finishers, Part I
Finishing for Non-Finishers, Part II
Finishing for Non-Finishers, Part III
_______
Jeff Zens owns and operates Custom Built Furniture in Salem, Oregon. He is a frequent woodworking instructor and writer.


